Zero to Director #1 — Concepts Before Canvas: What Actually Happens When You Click Queue

Every ComfyUI tutorial shows you a graph of boxes and wires and says "connect them like this." Nobody tells you what the boxes are doing, so the moment a wire is missing you're lost.
This series takes the opposite bet: concepts first, canvas second. By the end of this post you will understand the assembly line every diffusion workflow runs on — no images generated yet, nothing to install. From post #2 on, every single article builds one new station on that line, and you will be able to say why it exists before you ever drag it onto a canvas.
One warning: this series uses one metaphor everywhere — diffusion is carving — and it uses it with discipline. Every metaphor term in bold below is canon: the same word means the same thing in all twelve posts. Learn the six or so terms here and you have learned the vocabulary for the whole series.
What ComfyUI Is (and Isn't)
ComfyUI is a node graph editor for running AI models. A node is one small program with input sockets and output sockets: load this model, encode this text, denoise this tensor. A wire carries the output of one node into the input of another. That's the entire surface.
What makes it strange — and powerful — is what ComfyUI isn't:
- It isn't an app with a pipeline hidden inside. There is no "the pipeline." The graph you see is the pipeline. If a step exists, there is a box for it on your screen; if there is no box, the step does not happen.
- It isn't a model. ComfyUI drives models — files you keep locally, like
z_image_turbo_bf16.safetensors— and the same model behaves differently under different graphs. - It isn't opinionated. Preset apps hand you four sliders and a prayer. ComfyUI hands you the wiring diagram and lets you rewire it. That freedom is why it looks intimidating and why power users never leave.
So the skill you are actually learning in this series is not "which buttons to press." It is reading and editing a wiring diagram, one station at a time.
The Whole Trick in One Paragraph
Here is the entire secret of AI image generation, compressed:
A text encoder turns your prompt into a blueprint — a mathematical description of what you want. A sampler then takes a raw block of random noise and carves it, stroke by stroke, into something that matches the blueprint. Because carving happens in a compressed representation, a final decoder step must cast the finished carving into a real image.
Blueprint, raw block, carving, casting. Everything else in diffusion — every node, every slider, every acronym — is detail on one of those four nouns. The rest of this post makes those nouns precise.
The Assembly Line
Every text-to-image workflow ever posted — the simplest one-node-liner and the thousand-node monstrosities alike — runs the same line:
Walk the stations once, left to right, meeting the canon vocabulary as you go:
- The translator (text encoder). Your prompt is words; the model's world is numbers. The text encoder translates between them, turning sentences into conditioning — our blueprint. In this series the translator is usually
qwen_3_4b, and by post #6 it gets a promotion to a translator that can read images too. - The raw block (latent noise). Generation does not start from a blank canvas. It starts from a block of random noise, and the seed decides that noise's grain — its fixed internal texture. Same grain, same carving behavior. Keep this fact; it becomes a whole experiment later in this post.
- The carving (sampling). The sampler is the chisel driver. Steps are the number of strokes. The sampler algorithm is the stroke order. CFG is how much force the chisel applies toward the blueprint — turn it up and the carving obeys the letter of your prompt aggressively; turn it down and the stone's own tendencies show through. The model itself is the stone's memory of what things look like; a LoRA is a small toolbox of specialized chisels that changes how a particular model carves.
- The casting (VAE decode). Carving happens compressed (next section explains why). The VAE decoder casts the finished carving into the full-resolution image you actually see.
That's four stations and about a dozen bold terms. Here is the payoff: in twelve posts, no new assembly line ever appears. ControlNet adds a clamp that holds the carving's pose. IPAdapter puts a reference bust on the bench so the chisel can keep glancing at it. Video makes time the third dimension of the stone. New stations, same line. If you can read this diagram, you can read everything this series will ever build.
Three Ideas That Unlock Everything
The assembly line is what happens. These three ideas are why it works — and they answer the three questions beginners ask most: how does it "understand" words, why is it so fast, and why do settings like steps and CFG do what they do.
1. Vectors Are Meaning
A model cannot store the word "king." It stores a list of numbers — a vector — and in a well-trained model, position is meaning: related concepts live near each other in a huge coordinate space.
The classic demonstration is arithmetic on words:
| Analogy walk | Math on vectors | ≈ Result |
|---|---|---|
| king − man + woman | "royalty" minus "maleness", plus "femaleness" | queen |
| paris − france + japan | "capital city" relationship, applied to Japan | tokyo |
| car − road + rail | "vehicle" context swapped to rails | train |
Nobody programmed those identities in. They emerge because words used in similar ways must be stored at similar coordinates to be handled well. Your prompt's words become points in this space; the blueprint is built from those points. When the model "follows" your prompt, it is steering the carving toward the region of its coordinate space where those points live.
2. Latent Space Is the Compression Workshop
A 1024×1024 RGB image is about three million numbers. Carving would be impossibly slow at that size, so diffusion models cheat: they work on a compressed version of the image — the latent — a 128-by-128 grid where each cell holds sixteen numbers. That is roughly 262,000 numbers in all: about twelve times fewer than the three million of the full image.
Think of the latent as the workshop where carving actually happens: full-size blocks would never fit on the bench. All strokes, all grain, all blueprint-guidance operate on this compressed carving. Only at the very end does the VAE decoder decompress — cast — the finished latent into the millions-of-numbers image you can view. That is why the diagram above has a separate casting station instead of the sampler outputting an image directly.
3. Diffusion Is Carving
The namesake idea. "Diffusion" technically means adding noise to an image until it vanishes, then learning to run that backward. The useful mental model is simpler: generation is sculpture.
You start from a raw block of noise. Each step of sampling is one stroke of the chisel — crude shaping early, fine detail late. The blueprint steers every stroke; CFG is the force with which the blueprint is enforced per stroke.
Two concept experiments make this concrete (you will reproduce both yourself in post #2 — the workflows ship with it):
Experiment: Strokes of the Chisel. One prompt, one seed, and only the stroke count changes.
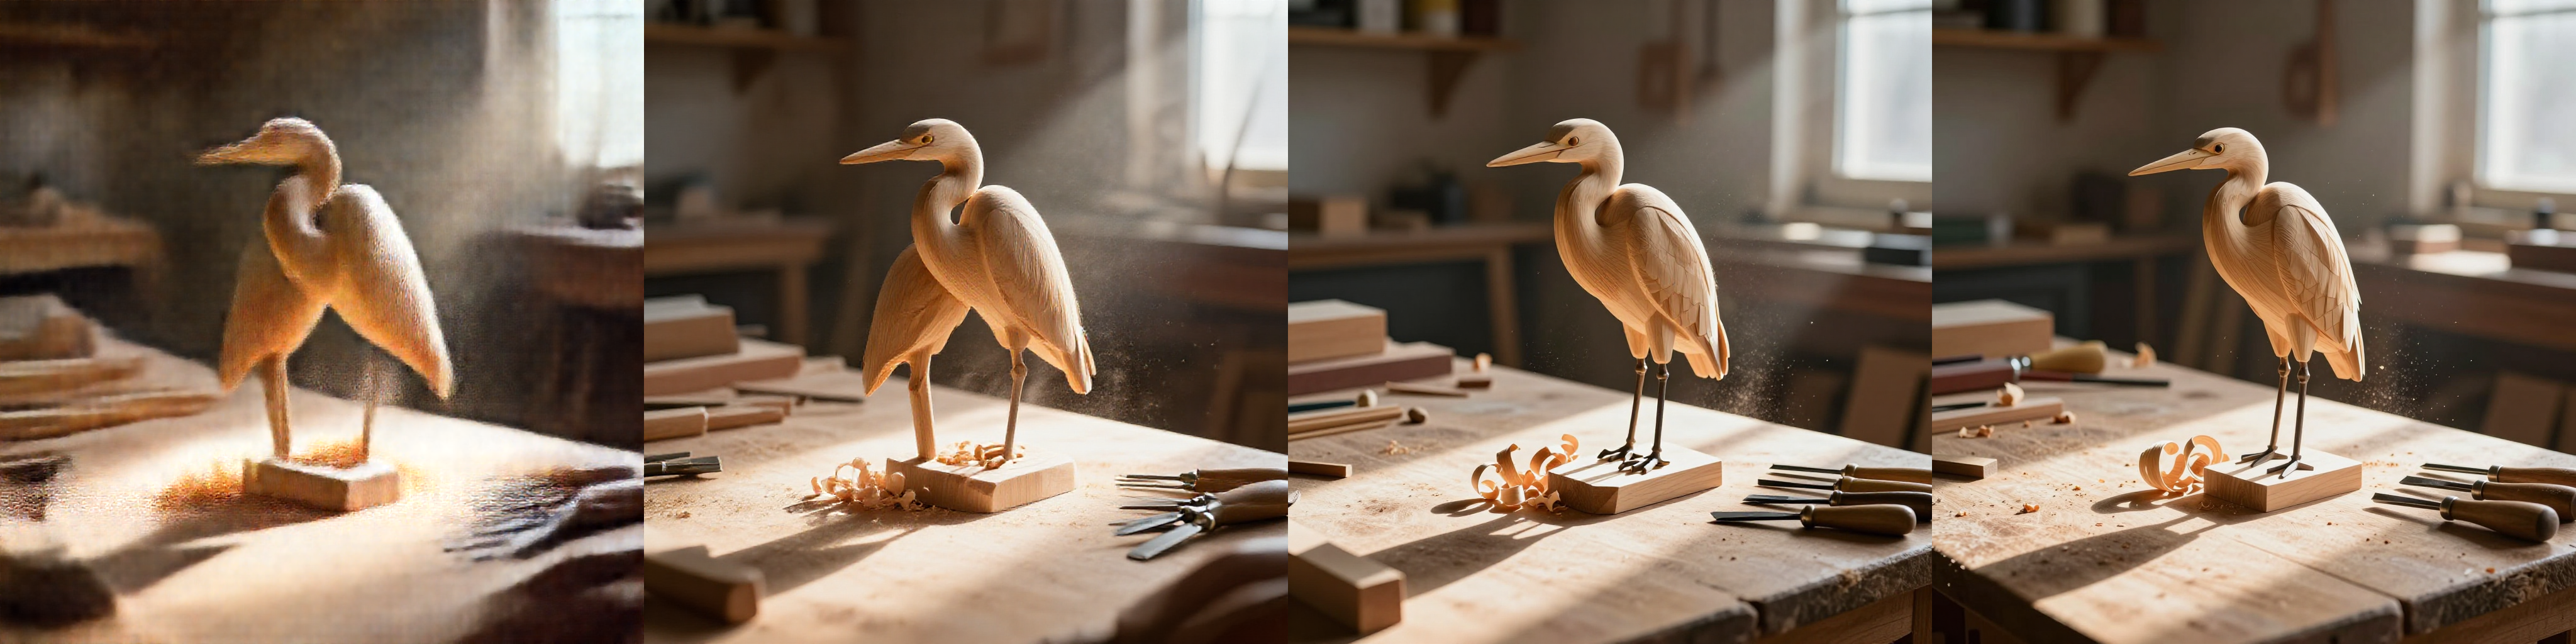
Watch the carving sequence: at one stroke there is only motion; by four strokes the composition is found; by eight the detail locks in. More strokes are not always better — past the point where detail locks, extra strokes just spend compute. Finding where detail locks in is a dial you will learn to read.
Experiment: Same Grain, Same Sculpture. Fix the seed, rerun, and the output is pixel-identical — the grain of the raw block fully determines the carving.
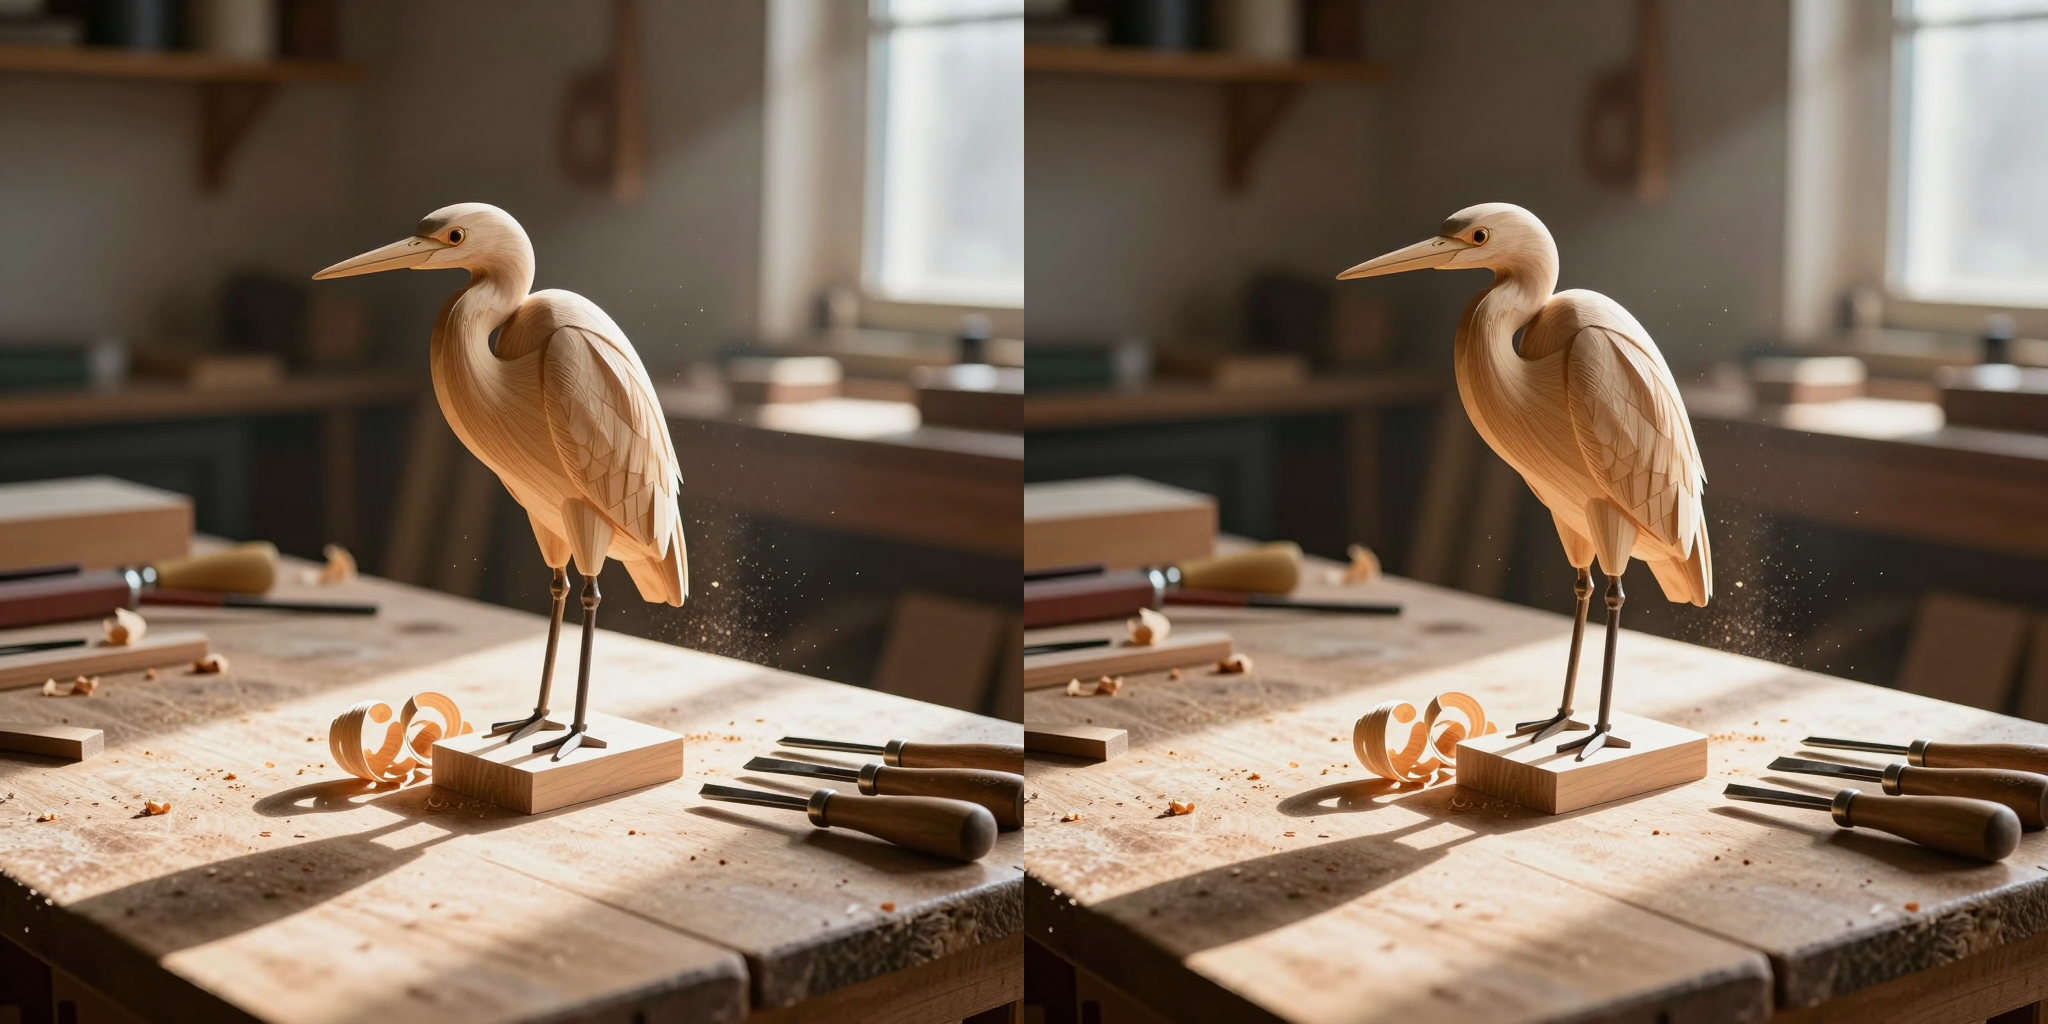
Now change one word of the prompt and keep the seed: the block keeps its grain — the same broad composition, the same regions of light and mass — but a new blueprint re-aims every stroke.
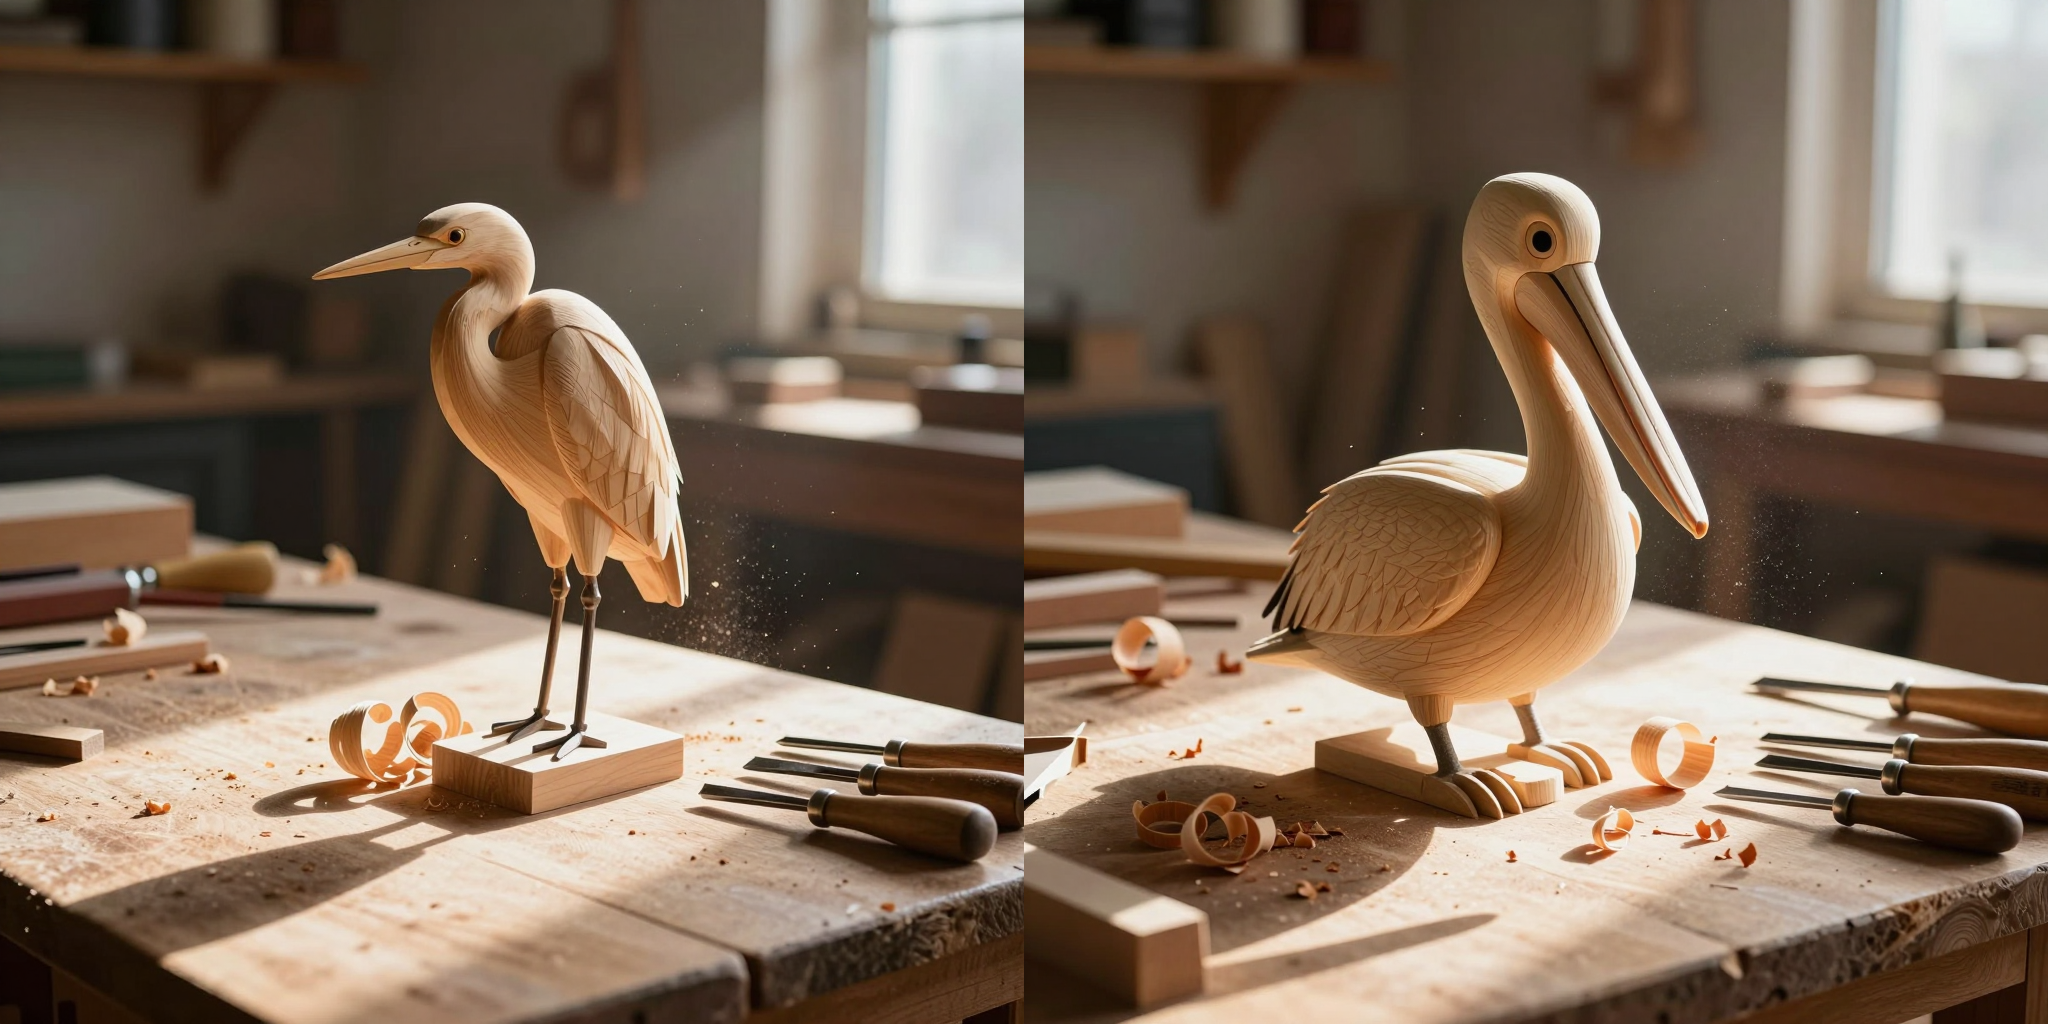
Seed controls which block you start from; prompt controls where the chisels aim. Every "how do I get consistent results?" question in ComfyUI reduces to which of those two you are accidentally changing.
What You'll Be Able to Do
Twelve posts, three acts, one graduation. The line never changes; your control over it deepens every week.
By the finish line, concretely, you will be able to:
- Read any ComfyUI workflow on sight — including thousand-node ones — because every station maps back to the assembly line above.
- Control output precisely: composition, structure, identity, and style as separate, deliberate dials (armatures, reference busts, and chisel toolboxes — posts 4, 5, 7).
- Edit images conversationally with a translator that reads pictures, not just words (post 6).
- Produce short films with synchronized sound, end to end, from a single bench (posts 8-10, 12).
- Dissect and rebuild a real production workflow — then design your own (posts 11-12).
How to Read This Series
- One increment per post. Every post after this one opens with the previous workflow and highlights exactly what's new. Old nodes dim, new nodes glow, and the article covers only the increment. If you ever feel lost, the previous post contains your missing piece.
- Workflows are included, not screenshotted. Each teaching workflow ships as a file you can drop straight into ComfyUI. The image experiments above are runs of post #2's starter graph — nothing is staged.
- You need: a machine with an NVIDIA GPU (8 GB VRAM carries Act I — ComfyUI automatically swaps what doesn't fit), ComfyUI installed, and patience measured in weeks — posts land one at a time, a few days apart, always in order.
- The metaphor is load-bearing. When a post says armature or casting, it means exactly what this post defined. Quick reference:
| Canon term | Plain meaning |
|---|---|
| raw block | the starting noise a sampler carves |
| grain | the seed's fixed texture in that block |
| blueprint | conditioning — what your prompt becomes |
| strokes / stroke order | sampler steps / sampler algorithm |
| force | CFG — how hard the blueprint is enforced |
| casting | VAE decoding to a real image |
| toolbox | LoRA — a box of specialized chisels |
| armature | ControlNet — a clamp holding structure |
| reference bust | IPAdapter — a statue the chisel keeps glancing at |
| translator | text encoder (later: one that reads images) |
Next post: you carve your first image. Same assembly line, one canvas, one Queue click — and by the end of it, every box on this page will have been in your own hands.
This is post 1 of the Zero to Director series. The full table of contents lives in the series navigator at the top of every post.